redis_0">redis从入门到精通
文章目录
redisredisio_2">1 redis简介(官网:redis.io)
为了提高网站响应速度,企业会将热点数据保存在内存中而不是直接从后端数据库中读取。大型网站应用,热点数据往往巨大,几十G上百G是很正常的事,这种情况下,就需要用到缓存服务器,通过缓存服务器承载大部分用户请求,小部分用户请求交给后端服务器处理,如此一来,就可以大大提高用户访问的速度,提升用户使用体验。
常用的缓存服务器有:
- memcache
- redis
Redis 是一种开源(BSD 许可)内存中数据结构存储,用作数据库、缓存、消息代理和流引擎。
为了实现最佳性能,Redis 使用 内存数据集。根据您的使用案例,Redis 可以通过定期将数据集转储到磁盘或将每个命令附加到基于磁盘的日志来持久保存您的数据。如果您只需要功能丰富的网络内存缓存,您还可以禁用持久性。
Redis 支持异步复制,具有快速非阻塞同步和自动重新连接以及网络分割上的部分重新同步。
redis_17">2 redis集群
redis_19">2.1 redis集群分类
集群是一组相互独立、通过高速网络互联的计算机,它们构成了一个组,并以单一系统的模式加以管理。一个客户与集群相互作用时,集群就像是一个独立的服务器。集群配置是用于提高可用性和可缩放性。
redis集群是一个由多个主从节点群组成的分布式服务集群,它具有复制、高可用和分片特性。
redis集群有三种集群模式:
- 主从模式
- 哨兵(Sentinel)模式
- Cluster模式
在服务开发中,单机都会存在单点故障的问题,即服务部署在一台服务器上,一旦服务器宕机服务就不可用,所以为了让服务高可用,分布式服务就出现了,将同一服务部署到多台机器上,即使其中几台服务器宕机,只要有一台服务器可用服务就可用。
redis也是一样,为了解决单机故障引入了主从模式,但主从模式存在一个问题:master节点故障后服务,需要人为的手动将slave节点切换成为maser节点后服务才恢复。redis为解决这一问题又引入了哨兵模式,哨兵模式能在master节点故障后能自动将salve节点提升成master节点,不需要人工干预操作就能恢复服务可用。
但是主从模式、哨兵模式都没有达到真正的数据sharding存储,每个redis实例中存储的都是全量数据,所以redis cluster就诞生了,实现了真正的数据分片存储。
2.2 主从模式
redis单节点虽然有通过RDB和AOF持久化机制能将数据持久化到硬盘上,但数据是存储在一台服务器上的,如果服务器出现硬盘故障等问题,会导致数据不可用,而且读写无法分离,读写都在同一台服务器上,请求量大时会出现I/O瓶颈。
为了避免单点故障 和 读写不分离,Redis 提供了复制(replication)功能实现master数据库中的数据更新后,会自动将更新的数据同步到其他slave数据库上。
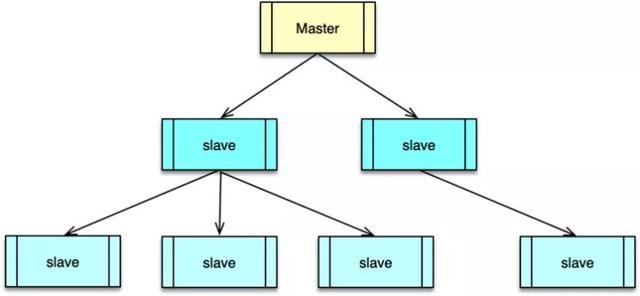
通过数据复制,Redis 的一个 master 可以挂载多个 slave,而 slave 下还可以挂载多个 slave,形成多层嵌套结构。所有写操作都在 master 实例中进行,master 执行完毕后,将写指令分发给挂在自己下面的 slave 节点。slave 节点下如果有嵌套的 slave,会将收到的写指令进一步分发给挂在自己下面的 slave。
通过多个 slave,Redis 的节点数据就可以实现多副本保存,任何一个节点异常都不会导致数据丢失,同时多 slave 可以 N 倍提升读性能。master 只写不读,这样整个 master-slave 组合,读写能力都可以得到大幅提升。
主从模式优缺点:
- 优点: 主从结构具有读写分离,提高效率、数据备份,提供多个副本等优点。
- 不足: 最大的不足就是主从模式不具备自动容错和恢复功能,主节点故障,集群则无法进行工作,可用性比较低,从节点升主节点需要人工手动干预。
普通的主从模式,当主数据库崩溃时,需要手动切换从数据库成为主数据库:
- 在从数据库中使用SLAVEOF NO ONE命令将从数据库提升成主数据继续服务。
- 其它的节点成为新主节点的从节点,并从新节点复制数据;
- 需要人工干预,无法实现高可用。
- 启动之前崩溃的主数据库,然后使用SLAVEOF命令将其设置成新的主数据库的从数据库,即可同步数据。
2.3 哨兵模式
主从同步/复制的模式,当主服务器宕机后,需要手动把一台从服务器切换为主服务器,这就需要人工干预,费事费力,还会造成一段时间内服务不可用,这时候就需要哨兵模式登场了。
哨兵模式是从Redis的2.6版本开始提供的,但是当时这个版本的模式是不稳定的,直到Redis的2.8版本以后,这个哨兵模式才稳定下来。
哨兵模式核心还是主从复制,只不过在相对于主从模式在主节点宕机导致不可写的情况下,多了一个竞选机制:从所有的从节点竞选出新的主节点。竞选机制的实现,是依赖于在系统中启动一个sentinel进程。

哨兵本身也有单点故障的问题,所以在一个一主多从的Redis系统中,可以使用多个哨兵进行监控,哨兵不仅会监控主数据库和从数据库,哨兵之间也会相互监控。每一个哨兵都是一个独立的进程,作为进程,它会独立运行。
2.3.1 哨兵模式的作用
监控所有服务器是否正常运行:通过发送命令返回监控服务器的运行状态,除了监控主服务器、从服务器外,哨兵之间也相互监控。
故障切换:当哨兵监测到master宕机,会自动将slave切换成master,然后通过发布订阅模式通知其他的从服务器,修改配置文件,让它们切换master。同时那台有问题的旧主也会变为新主的从,也就是说当旧的主即使恢复时,并不会恢复原来的主身份,而是作为新主的一个从。
2.3.2 哨兵模式优缺点
优点:
- 哨兵模式是基于主从模式的,解决主从模式中master故障不能自动切换故障的问题。
缺点:
- 哨兵模式下每台 Redis 服务器都存储相同的数据,很浪费内存空间;数据量太大,主从同步时严重影响了master性能。
- 哨兵模式是中心化的集群实现方案,每个从机和主机的耦合度很高,master宕机到salve选举master恢复期间服务不可用。因为投票选举结束之前,谁也不知道主机和从机是谁,此时Redis也会开启保护机制,禁止写操作,直到选举出了新的Redis主机。
- 哨兵模式始终只有一个Redis主机来接收和处理写请求,写操作还是受单机瓶颈影响,没有实现真正的分布式架构。
2.4 Cluster模式
主从模式或哨兵模式每个节点存储的数据都是全量的数据,数据量过大时,就需要对存储的数据进行分片后存储到多个redis实例上。此时就要用到Redis Sharding技术。
redis在3.0上加入了 Cluster 集群模式,实现了 Redis 的分布式存储,也就是说每台 Redis 节点上存储不同的数据。cluster模式为了解决单机Redis容量有限的问题,将数据按一定的规则分配到多台机器,内存/QPS不受限于单机,可受益于分布式集群高扩展性。
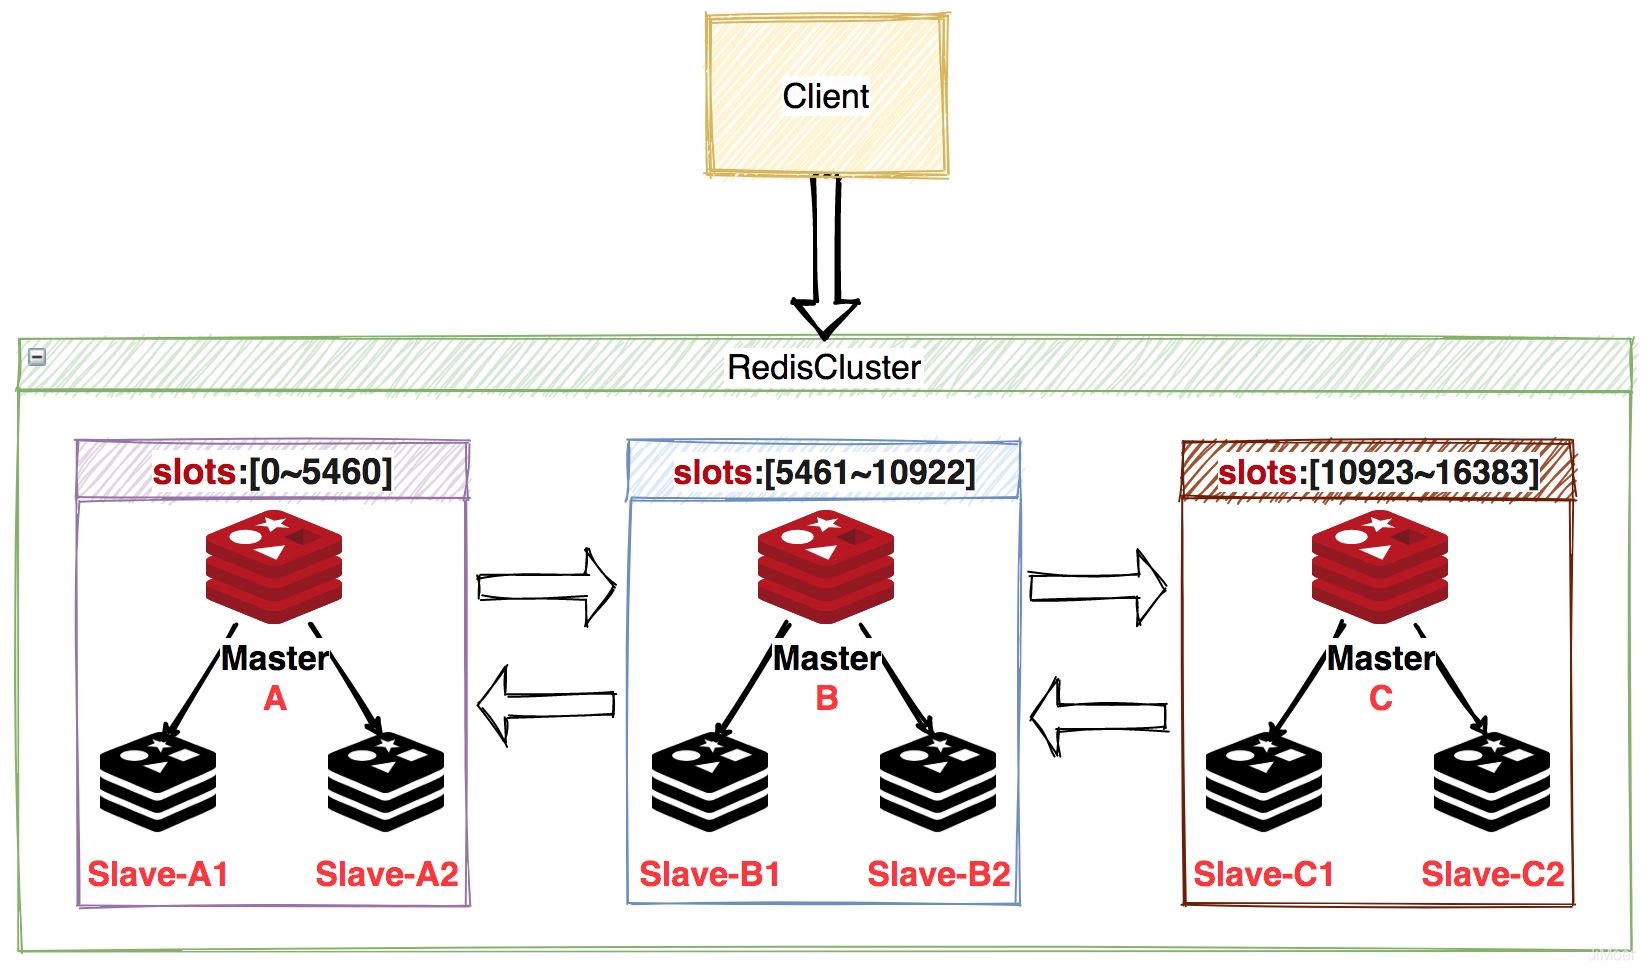
Redis Cluster是一种服务器Sharding技术(分片和路由都是在服务端实现),采用多主多从,每一个分区都是由一个Redis主机和多个从机组成,片区和片区之间是相互平行的。Redis Cluster集群采用了P2P的模式,完全去中心化。
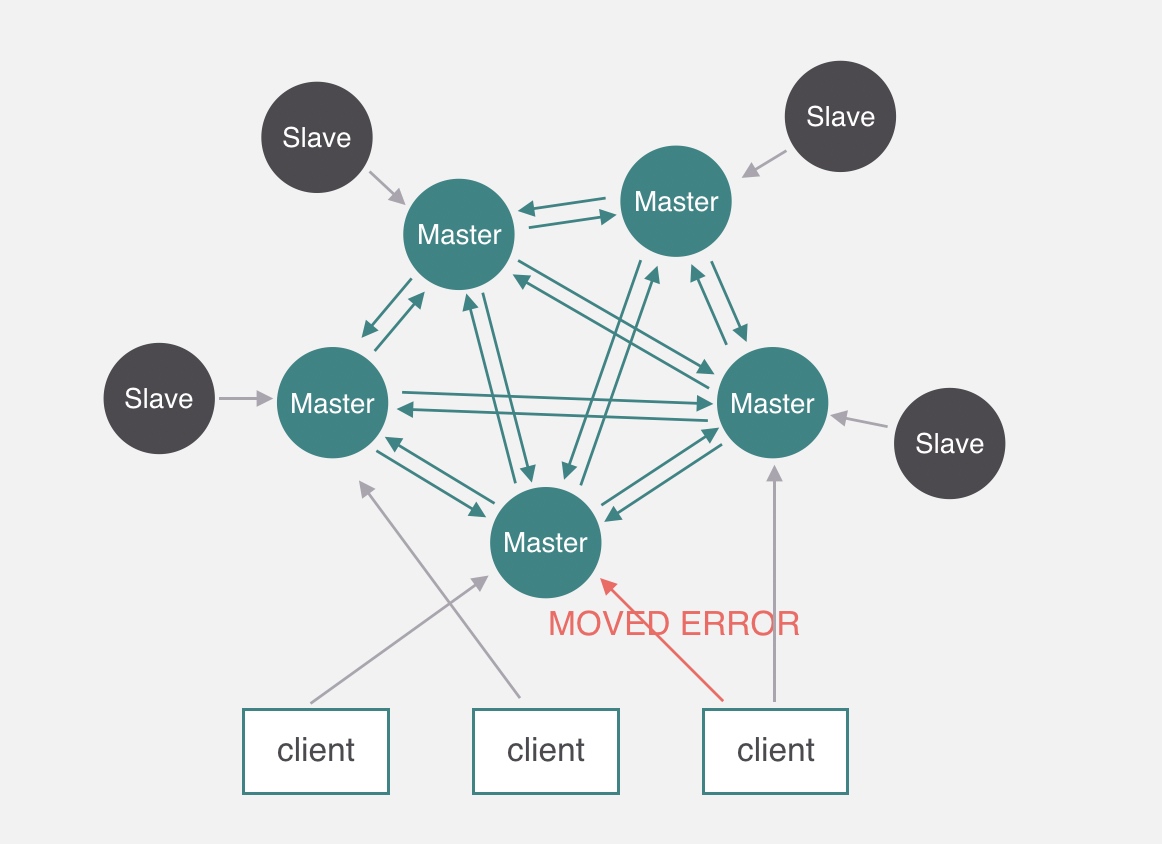
官方推荐,集群部署至少要 3 台以上的master节点,最好使用 3 主 3 从六个节点的模式。Redis Cluster集群具有如下几个特点:
- 集群完全去中心化,采用多主多从;所有的redis节点彼此互联(PING-PONG机制),内部使用二进制协议优化传输速度和带宽。
- 客户端与 Redis 节点直连,不需要中间代理层。客户端不需要连接集群所有节点,连接集群中任何一个可用节点即可。
- 每一个分区都是由一个Redis主机和多个从机组成,分片和分片之间是相互平行的。
- 每一个master节点负责维护一部分槽,以及槽所映射的键值数据;集群中每个节点都有全量的槽信息,通过槽每个node都知道具体数据存储到哪个node上。
redis cluster主要是针对海量数据+高并发+高可用的场景,如果你的数据量很大,那么建议就用redis cluster,数据量不是很大时,使用sentinel就够了。redis cluster的性能和高可用性均优于哨兵模式。
Redis Cluster采用虚拟哈希槽分区而非一致性hash算法,预先分配一些卡槽,所有的键根据哈希函数映射到这些槽内,每一个分区内的master节点负责维护一部分槽以及槽所映射的键值数据。
redis_127">3 redis应用(注:下面是在一台主机上面做的实验,建议使用多台主机)
redis_129">3.1 redis单机部署
1.安装依赖包
[root@localhost ~]# yum -y install wget make gcc gcc-c++ vim
Complete!

2.下载redis包
[root@localhost ~]# wget https://download.redis.io/redis-stable.tar.gz
--2024-01-02 14:16:39--  https://download.redis.io/redis-stable.tar.gz
Resolving download.redis.io (download.redis.io)... 45.60.125.1
Connecting to download.redis.io (download.redis.io)|45.60.125.1|:443... connected.
HTTP request sent, awaiting response... 200 OK
Length: 3477620 (3.3M) [application/octet-stream]
Saving to: ‘redis-stable.tar.gz’

redis-stable.tar.gz                       100%[===================================================================================>]   3.32M   818KB/s    in 4.2s

2024-01-02 14:16:45 (802 KB/s) - ‘redis-stable.tar.gz’ saved [3477620/3477620]

3.解压软件包
[root@localhost ~]# ls
anaconda-ks.cfg  redis-stable.tar.gz
[root@localhost ~]# tar xf redis-stable.tar.gz
[root@localhost ~]# ls
anaconda-ks.cfg  redis-stable  redis-stable.tar.gz

4.编译
[root@localhost ~]# cd redis-stable
[root@localhost redis-stable]# make
[root@localhost redis-stable]# echo $?
0
[root@localhost redis-stable]# make install
[root@localhost redis-stable]# echo $?
0

5.配置
[root@localhost redis-stable]# echo 'vm.overcommit_memory = 1' >> /etc/sysctl.conf
[root@localhost redis-stable]# tail /etc/sysctl.conf
# /usr/lib/sysctl.d/, /run/sysctl.d/, and /etc/sysctl.d/.
#
# Vendors settings live in /usr/lib/sysctl.d/.
# To override a whole file, create a new file with the same in
# /etc/sysctl.d/ and put new settings there. To override
# only specific settings, add a file with a lexically later
# name in /etc/sysctl.d/ and put new settings there.
#
# For more information, see sysctl.conf(5) and sysctl.d(5).
vm.overcommit_memory = 1
[root@localhost redis-stable]# sysctl -p
vm.overcommit_memory = 1
[root@localhost redis-stable]# echo never > /sys/kernel/mm/transparent_hugepage/enabled

6.创建配置文件存放目录
[root@localhost redis-stable]# mkdir /etc/redis
[root@localhost redis-stable]# ls
00-RELEASENOTES  CODE_OF_CONDUCT.md  COPYING  INSTALL   MANIFESTO  redis.conf  runtest-cluster    runtest-sentinel  sentinel.conf  tests   utils
BUGS             CONTRIBUTING.md     deps     Makefile  README.md  runtest     runtest-moduleapi  SECURITY.md       src            TLS.md
[root@localhost redis-stable]# cp redis.conf /etc/redis/

7.应用
[root@localhost ~]# cd /etc/redis/
[root@localhost redis]# ls
redis.conf
[root@localhost redis]# ss -antl
State              Recv-Q             Send-Q                           Local Address:Port                           Peer Address:Port             Process
LISTEN             0                  128                                    0.0.0.0:22                                  0.0.0.0:*
LISTEN             0                  128                                       [::]:22                                     [::]:*
[root@localhost redis]# redis-server /etc/redis/redis.conf
60851:C 02 Jan 2024 14:29:36.514 * oO0OoO0OoO0Oo Redis is starting oO0OoO0OoO0Oo
60851:C 02 Jan 2024 14:29:36.515 * Redis version=7.2.3, bits=64, commit=00000000, modified=0, pid=60851, just started
60851:C 02 Jan 2024 14:29:36.515 * Configuration loaded
60851:M 02 Jan 2024 14:29:36.516 * Increased maximum number of open files to 10032 (it was originally set to 1024).
60851:M 02 Jan 2024 14:29:36.516 * monotonic clock: POSIX clock_gettime
                _._
           _.-``__ ''-._
      _.-``    `.  `_.  ''-._           Redis 7.2.3 (00000000/0) 64 bit
  .-`` .-```.  ```\/    _.,_ ''-._
 (    '      ,       .-`  | `,    )     Running in standalone mode
 |`-._`-...-` __...-.``-._|'` _.-'|     Port: 6379
 |    `-._   `._    /     _.-'    |     PID: 60851
  `-._    `-._  `-./  _.-'    _.-'
 |`-._`-._    `-.__.-'    _.-'_.-'|
 |    `-._`-._        _.-'_.-'    |           https://redis.io
  `-._    `-._`-.__.-'_.-'    _.-'
 |`-._`-._    `-.__.-'    _.-'_.-'|
 |    `-._`-._        _.-'_.-'    |
  `-._    `-._`-.__.-'_.-'    _.-'
      `-._    `-.__.-'    _.-'
          `-._        _.-'
              `-.__.-'

60851:M 02 Jan 2024 14:29:36.523 * Server initialized
60851:M 02 Jan 2024 14:29:36.524 * Ready to accept connections tcp
[root@localhost ~]# ss -antl
State              Recv-Q             Send-Q                           Local Address:Port                           Peer Address:Port             Process
LISTEN             0                  511                                  127.0.0.1:6379                                0.0.0.0:*
LISTEN             0                  128                                    0.0.0.0:22                                  0.0.0.0:*
LISTEN             0                  511                                      [::1]:6379                                   [::]:*
LISTEN             0                  128                                       [::]:22                                     [::]:*
[root@localhost ~]# redis-cli
127.0.0.1:6379> set name zhangsan
OK
127.0.0.1:6379> set age 20
OK
127.0.0.1:6379> keys *
1) "age"
2) "name"
127.0.0.1:6379> quit
[root@localhost ~]# pkill redis
[root@localhost ~]# ss -antl
State              Recv-Q             Send-Q                           Local Address:Port                           Peer Address:Port             Process
LISTEN             0                  128                                    0.0.0.0:22                                  0.0.0.0:*
LISTEN             0                  128                                       [::]:22                                     [::]:*
使redis在后台运行需要修改配置文件/etc/redis/redis.conf,将daemonize值设为yes
默认情况下,redis连接是不需要经过认证的,而redis承载了企业大部分的请求流量,如果不经过认证很有可能在互联网上遭受攻击,所以需要在配置文件中为redis设置密码认证,且密码最好随机生成,保证没有规律可言。
redis_248">3.2 redis主从
1.生成主配置文件和从配置文件
[root@localhost ~]# cd /etc/redis/
[root@localhost redis]# ls
dump.rdb  redis.conf
[root@localhost redis]# mv redis.conf 6379.conf
[root@localhost redis]# cp 6379.conf 6380.conf
[root@localhost redis]# ls
6379.conf  6380.conf  dump.rdb
[root@localhost redis]# rm -f dump.rdb
[root@localhost redis]# ls
6379.conf  6380.conf

2.编辑配置文件
[root@localhost redis]# vim 6379.conf
bind 192.168.116.140
port 6379
protected-mode no
requirepass Passw0rd@_~
daemonize yes                        //守护进程
logfile "/var/log/redis6379.log"    //日志

[root@localhost redis]# vim 6380.conf
bind 192.168.116.140
port 6380
protected-mode no
replicaof 192.168.116.140 6379
masterauth Passw0rd@_~
daemonize yes
logfile "/var/log/redis6379.log"
[root@localhost redis]# sed -i 's/6379/6380/g' /etc/redis/6380.conf

3.应用
[root@localhost ~]# redis-server /etc/redis/6379.conf
[root@localhost ~]# redis-server /etc/redis/6380.conf
[root@localhost ~]# ss -antl
State              Recv-Q             Send-Q                           Local Address:Port                           Peer Address:Port             Process
LISTEN             0                  511                            192.168.116.140:6380                                0.0.0.0:*
LISTEN             0                  511                            192.168.116.140:6379                                0.0.0.0:*
LISTEN             0                  128                                    0.0.0.0:22                                  0.0.0.0:*
LISTEN             0                  128                                       [::]:22                                     [::]:*
[root@localhost ~]# ps -ef | grep redis
root      276081       1  0 15:15 ?        00:00:00 redis-server 192.168.116.140:6379
root      293866       1  0 15:19 ?        00:00:00 redis-server 192.168.116.140:6380
root      296711   69038  0 15:20 pts/2    00:00:00 grep --color=auto redis
[root@localhost ~]# redis-cli -h 192.168.116.140 -p 6379
192.168.116.140:6379> keys *
(error) NOAUTH Authentication required.
192.168.116.140:6379> auth Passw0rd@_~
OK
192.168.116.140:6379> keys *
(empty array)
192.168.116.140:6379> set name zhangsan
OK
192.168.116.140:6379> set age 20
OK
192.168.116.140:6379> keys *
1) "age"
2) "name"
192.168.116.140:6379> info replication
# Replication
role:master
connected_slaves:0
master_failover_state:no-failover
master_replid:892d1dc69e44d4245f3b107b34c17342bc91e132
master_replid2:0000000000000000000000000000000000000000
master_repl_offset:0
second_repl_offset:-1
repl_backlog_active:0
repl_backlog_size:1048576
repl_backlog_first_byte_offset:0
repl_backlog_histlen:0
192.168.116.140:6379> quit

[root@localhost ~]# redis-cli -h 192.168.116.140 -p 6380
192.168.116.140:6380> keys *
1) "name"
2) "age"
192.168.116.140:6380> get name
"zhangsan"
192.168.116.140:6380> get age
"20"
192.168.116.140:6380> info replication
# Replication
role:slave
master_host:192.168.116.140
master_port:6379
master_link_status:up
master_last_io_seconds_ago:3
master_sync_in_progress:0
slave_read_repl_offset:154
slave_repl_offset:154
slave_priority:100
slave_read_only:1
replica_announced:1
connected_slaves:0
master_failover_state:no-failover
master_replid:0a4abc9b2f3281afa86bb9f68ab2b7bec769aa63
master_replid2:0000000000000000000000000000000000000000
master_repl_offset:154
second_repl_offset:-1
repl_backlog_active:1
repl_backlog_size:1048576
repl_backlog_first_byte_offset:1
repl_backlog_histlen:154
192.168.116.140:6380>
redis_359">3.3 redis哨兵
1.复制配置文件到指定的存放位置
[root@localhost ~]# cd redis-stable
[root@localhost redis-stable]# ls
00-RELEASENOTES  CODE_OF_CONDUCT.md  COPYING  INSTALL   MANIFESTO  redis.conf  runtest-cluster    runtest-sentinel  sentinel.conf  tests   utils
BUGS             CONTRIBUTING.md     deps     Makefile  README.md  runtest     runtest-moduleapi  SECURITY.md       src            TLS.md
[root@localhost redis-stable]# cp redis.conf /etc/redis/
[root@localhost redis-stable]# cp sentinel.conf /etc/redis/
[root@localhost redis-stable]# ls /etc/redis/
redis.conf  sentinel.conf

2.编辑配置文件
[root@localhost ~]# cd /etc/redis/
[root@localhost redis]# ls
redis.conf  sentinel.conf
[root@localhost redis]# mv redis.conf 6379.conf
[root@localhost redis]# ls
6379.conf  sentinel.conf
[root@localhost redis]# vim 6379.conf
bind 192.168.116.140
protected-mode yes
port 6379
daemonize yes
logfile "/var/log/redis6379.log"
requirepass Passw0rd@_~
[root@localhost redis]# cp 6379.conf 6380.conf
[root@localhost redis]# cp 6379.conf 6381.conf
[root@localhost redis]# sed -i 's/6379/6380/g' /etc/redis/6380.conf
[root@localhost redis]# sed -i 's/6379/6381/g' /etc/redis/6381.conf
[root@localhost redis]# ls
6379.conf  6380.conf  6381.conf  sentinel.conf
[root@localhost redis]# cp 6379.conf 6389.conf
[root@localhost redis]# sed -i 's/6379/6389/g' /etc/redis/6389.conf
[root@localhost redis]# vim 6389.conf
protected-mode no
daemonize yes
replicaof 192.168.116.140 6379
masterauth Passw0rd@_~
[root@localhost redis]# cp 6389.conf 6390.conf
[root@localhost redis]# cp 6389.conf 6391.conf
[root@localhost redis]# sed -i 's/6389/6390/g' /etc/redis/6390.conf
[root@localhost redis]# sed -i 's/6389/6391/g' /etc/redis/6391.conf
[root@localhost redis]# vim 6390.conf
replicaof 192.168.116.140 6380
masterauth Passw0rd@_~
[root@localhost redis]# vim 6391.conf
replicaof 192.168.116.140 6381
masterauth Passw0rd@_~
[root@localhost redis]# vim sentinel.conf
protected-mode no
daemonize yes
pidfile /var/run/redis-sentinel1.pid
sentinel monitor mymaster1 192.168.116.140 6379 2
sentinel monitor mymaster2 192.168.116.140 6380 2
sentinel monitor mymaster3 192.168.116.140 6381 2
sentinel monitor myslave1 192.168.116.140 6389 2
sentinel monitor myslave2 192.168.116.140 6390 2
sentinel monitor myslave3 192.168.116.140 6391 2

sentinel auth-pass mymaster1 Passw0rd@_~
sentinel auth-pass mymaster2 Passw0rd@_~
sentinel auth-pass mymaster3 Passw0rd@_~
sentinel auth-pass myslave1 Passw0rd@_~
sentinel auth-pass myslave2 Passw0rd@_~
sentinel auth-pass myslave3 Passw0rd@_~

sentinel down-after-milliseconds mymaster1 30000
sentinel down-after-milliseconds mymaster2 30000
sentinel down-after-milliseconds mymaster3 30000
sentinel down-after-milliseconds myslave1 30000
sentinel down-after-milliseconds myslave2 30000
sentinel down-after-milliseconds myslave3 30000

sentinel parallel-syncs mymaster1 1
sentinel parallel-syncs mymaster2 1
sentinel parallel-syncs mymaster3 1
sentinel parallel-syncs myslave1 1
sentinel parallel-syncs myslave2 1
sentinel parallel-syncs myslave3 1

sentinel failover-timeout mymaster1 180000
sentinel failover-timeout mymaster2 180000
sentinel failover-timeout mymaster3 180000
sentinel failover-timeout myslave1 180000
sentinel failover-timeout myslave2 180000
sentinel failover-timeout myslave3 180000

SENTINEL master-reboot-down-after-period mymaster1 0
SENTINEL master-reboot-down-after-period mymaster2 0
SENTINEL master-reboot-down-after-period mymaster3 0
SENTINEL master-reboot-down-after-period myslave1 0
SENTINEL master-reboot-down-after-period myslave2 0
SENTINEL master-reboot-down-after-period myslave3 0
[root@localhost redis]# mv sentinel.conf sentinel26379.conf
[root@localhost redis]# cp sentinel26379.conf sentinel26380.conf
[root@localhost redis]# cp sentinel26379.conf sentinel26381.conf
[root@localhost redis]# vim sentinel26380.conf
port 26380
pidfile /var/run/redis-sentinel2.pid
[root@localhost redis]# vim sentinel26381.conf
port 26381
pidfile /var/run/redis-sentinel3.pid
[root@localhost redis]# ls
6379.conf  6380.conf  6381.conf  6389.conf  6390.conf  6391.conf  sentinel26379.conf  sentinel26380.conf  sentinel26381.conf

3.应用
[root@localhost redis]# redis-server 6379.conf
[root@localhost redis]# redis-server 6380.conf
[root@localhost redis]# redis-server 6381.conf
[root@localhost redis]# redis-server 6389.conf
[root@localhost redis]# redis-server 6390.conf
[root@localhost redis]# redis-server 6391.conf
[root@localhost redis]# redis-sentinel sentinel26379.conf
[root@localhost redis]# redis-sentinel sentinel26380.conf
[root@localhost redis]# redis-sentinel sentinel26381.conf
[root@localhost redis]# ss -antl
State              Recv-Q             Send-Q                           Local Address:Port                           Peer Address:Port             Process
LISTEN             0                  511                            192.168.116.140:6381                                0.0.0.0:*
LISTEN             0                  511                            192.168.116.140:6380                                0.0.0.0:*
LISTEN             0                  511                            192.168.116.140:6379                                0.0.0.0:*
LISTEN             0                  511                            192.168.116.140:6391                                0.0.0.0:*
LISTEN             0                  511                            192.168.116.140:6390                                0.0.0.0:*
LISTEN             0                  511                            192.168.116.140:6389                                0.0.0.0:*
LISTEN             0                  128                                    0.0.0.0:22                                  0.0.0.0:*
LISTEN             0                  511                                    0.0.0.0:26380                               0.0.0.0:*
LISTEN             0                  511                                    0.0.0.0:26381                               0.0.0.0:*
LISTEN             0                  511                                    0.0.0.0:26379                               0.0.0.0:*
LISTEN             0                  128                                       [::]:22                                     [::]:*
LISTEN             0                  511                                       [::]:26380                                  [::]:*
LISTEN             0                  511                                       [::]:26381                                  [::]:*
LISTEN             0                  511                                       [::]:26379                                  [::]:*
[root@localhost redis]# ps -ef | grep redis
root      693249       1  0 16:41 ?        00:00:01 redis-server 192.168.116.140:6379
root      693755       1  0 16:41 ?        00:00:01 redis-server 192.168.116.140:6380
root      694111       1  0 16:42 ?        00:00:01 redis-server 192.168.116.140:6381
root      694467       1  0 16:42 ?        00:00:01 redis-server 192.168.116.140:6389
root      694925       1  0 16:42 ?        00:00:01 redis-server 192.168.116.140:6390
root      695783       1  0 16:42 ?        00:00:01 redis-server 192.168.116.140:6391
root      770263       1  0 16:57 ?        00:00:00 redis-sentinel *:26379 [sentinel]
root      770869       1  0 16:57 ?        00:00:00 redis-sentinel *:26380 [sentinel]
root      772725       1  0 16:58 ?        00:00:00 redis-sentinel *:26381 [sentinel]
root      783232   69038  0 17:00 pts/2    00:00:00 grep --color=auto redis
[root@localhost ~]# redis-cli -h 192.168.116.140 -p 6379
192.168.116.140:6379> auth Passw0rd@_~
OK
192.168.116.140:6379> set name zhangsan
OK
192.168.116.140:6379> set age 20
OK
192.168.116.140:6379> keys *
1) "age"
2) "name"
192.168.116.140:6379> info replication
# Replication
role:master
connected_slaves:1
slave0:ip=192.168.116.140,port=6389,state=online,offset=52244,lag=1
master_failover_state:no-failover
master_replid:74ff874179735d1c214844cdc9cc326d421409fa
master_replid2:0000000000000000000000000000000000000000
master_repl_offset:52536
second_repl_offset:-1
repl_backlog_active:1
repl_backlog_size:1048576
repl_backlog_first_byte_offset:1
repl_backlog_histlen:52536
192.168.116.140:6379> quit
[root@localhost ~]# redis-cli -h 192.168.116.140 -p 6389
192.168.116.140:6389> keys *
(error) NOAUTH Authentication required.
192.168.116.140:6389> auth Passw0rd@_~
OK
192.168.116.140:6389> keys *
1) "name"
2) "age"
192.168.116.140:6389> info replication
# Replication
role:slave
master_host:192.168.116.140
master_port:6379
master_link_status:up
master_last_io_seconds_ago:0
master_sync_in_progress:0
slave_read_repl_offset:70912
slave_repl_offset:70912
slave_priority:100
slave_read_only:1
replica_announced:1
connected_slaves:0
master_failover_state:no-failover
master_replid:74ff874179735d1c214844cdc9cc326d421409fa
master_replid2:0000000000000000000000000000000000000000
master_repl_offset:70912
second_repl_offset:-1
repl_backlog_active:1
repl_backlog_size:1048576
repl_backlog_first_byte_offset:1
repl_backlog_histlen:70912
192.168.116.140:6389> quit
[root@localhost ~]# ps -ef | grep redis
root      693249       1  0 16:41 ?        00:00:02 redis-server 192.168.116.140:6379
root      693755       1  0 16:41 ?        00:00:01 redis-server 192.168.116.140:6380
root      694111       1  0 16:42 ?        00:00:02 redis-server 192.168.116.140:6381
root      694467       1  0 16:42 ?        00:00:02 redis-server 192.168.116.140:6389
root      694925       1  0 16:42 ?        00:00:02 redis-server 192.168.116.140:6390
root      695783       1  0 16:42 ?        00:00:02 redis-server 192.168.116.140:6391
root      770263       1  0 16:57 ?        00:00:01 redis-sentinel *:26379 [sentinel]
root      770869       1  0 16:57 ?        00:00:01 redis-sentinel *:26380 [sentinel]
root      772725       1  0 16:58 ?        00:00:01 redis-sentinel *:26381 [sentinel]
root      802450   69038  0 17:04 pts/2    00:00:00 grep --color=auto redis
[root@localhost ~]# kill -9 693249
[root@localhost ~]# ps -ef | grep redis
root      693755       1  0 16:41 ?        00:00:01 redis-server 192.168.116.140:6380
root      694111       1  0 16:42 ?        00:00:02 redis-server 192.168.116.140:6381
root      694467       1  0 16:42 ?        00:00:02 redis-server 192.168.116.140:6389
root      694925       1  0 16:42 ?        00:00:02 redis-server 192.168.116.140:6390
root      695783       1  0 16:42 ?        00:00:02 redis-server 192.168.116.140:6391
root      770263       1  0 16:57 ?        00:00:01 redis-sentinel *:26379 [sentinel]
root      770869       1  0 16:57 ?        00:00:01 redis-sentinel *:26380 [sentinel]
root      772725       1  0 16:58 ?        00:00:01 redis-sentinel *:26381 [sentinel]
root      803952   69038  0 17:04 pts/2    00:00:00 grep --color=auto redis
[root@localhost ~]# redis-cli -h 192.168.116.140 -p 6389
192.168.116.140:6389> keys *
(error) NOAUTH Authentication required.
192.168.116.140:6389> auth Passw0rd@_~
OK
192.168.116.140:6389> keys *
1) "name"
2) "age"
192.168.116.140:6389> info replication
# Replication
role:master
connected_slaves:0
master_failover_state:no-failover
master_replid:3214d5a06f74c86f7bea1e02c0f886c040abf877
master_replid2:74ff874179735d1c214844cdc9cc326d421409fa
master_repl_offset:128127
second_repl_offset:87801
repl_backlog_active:1
repl_backlog_size:1048576
repl_backlog_first_byte_offset:1
repl_backlog_histlen:128127
192.168.116.140:6389>
在sentinel集群环境下需要多个sentinel互相沟通来确认某个master是否真的死了,quorum这个参数是进行客观下线的一个依据,意思是至少有quorum个sentinel认为这个master有故障,才会对这个master进行下线以及故障转移。因为有的时候,某个sentinel节点可能因为自身网络原因,导致无法连接master,而此时master并没有出现故障,所以,这就需要多个sentinel都一致认为该master有问题,才可以进行下一步操作,这就保证了公平性和高可用。
redisCluster_608">3.4 redisCluster(每一个节点存储的数据是不同的,不会出现重复的现象)
1.配置配置文件
[root@localhost ~]# cd redis-stable
[root@localhost redis-stable]# ls
00-RELEASENOTES  CODE_OF_CONDUCT.md  COPYING  INSTALL   MANIFESTO  redis.conf  runtest-cluster    runtest-sentinel  sentinel.conf  tests   utils
BUGS             CONTRIBUTING.md     deps     Makefile  README.md  runtest     runtest-moduleapi  SECURITY.md       src            TLS.md
[root@localhost redis-stable]# cp redis.conf /etc/redis/
[root@localhost redis-stable]# cd
[root@localhost ~]# cd /etc/redis/
[root@localhost redis]# ls
redis.conf
[root@localhost redis]# mv redis.conf 6379.conf
[root@localhost redis]# cp 6379.conf 6380.conf
[root@localhost redis]# cp 6379.conf 6381.conf
[root@localhost redis]# cp 6379.conf 6389.conf
[root@localhost redis]# cp 6379.conf 6390.conf
[root@localhost redis]# cp 6379.conf 6391.conf
[root@localhost redis]# pwd
/etc/redis
[root@localhost redis]# ls
6379.conf  6380.conf  6381.conf  6389.conf  6390.conf  6391.conf
[root@localhost redis]# vim 6379.conf
bind 192.168.116.140
port 6379
cluster-enabled yes
cluster-config-file nodes-6379.conf
cluster-node-timeout 15000
appendonly yes
daemonize yes
[root@localhost redis]# vim 6380.conf       //编辑内容同上
[root@localhost redis]# sed -i 's/6379/6380/g' /etc/redis/6380.conf
[root@localhost redis]# vim 6381.conf       //编辑内容同上
[root@localhost redis]# sed -i 's/6379/6381/g' /etc/redis/6381.conf
[root@localhost redis]# vim 6389.conf
bind 192.168.116.140
port 6389
cluster-enabled yes
cluster-config-file nodes-6379.conf
cluster-node-timeout 15000
appendonly yes
daemonize yes
[root@localhost redis]# sed -i 's/6379/6389/g' /etc/redis/6389.conf
[root@localhost redis]# vim 6390.conf    //同上把指定服从主的服务器端口改一下
[root@localhost redis]# sed -i 's/6379/6390/g' /etc/redis/6390.conf
[root@localhost redis]# vim 6391.conf    //同上
[root@localhost redis]# sed -i 's/6379/6391/g' /etc/redis/6391.conf

2.启动服务
[root@localhost redis]# vim /usr/bin/redis-daemon
[root@localhost redis]# cat /usr/bin/redis-daemon
#!/bin/bash

redis-server /etc/redis/6379.conf
redis-server /etc/redis/6380.conf
redis-server /etc/redis/6381.conf
redis-server /etc/redis/6389.conf
redis-server /etc/redis/6390.conf
redis-server /etc/redis/6391.conf
[root@localhost redis]# chmod +x /usr/bin/redis-daemon
[root@localhost redis]# ll /usr/bin/redis-daemon
-rwxr-xr-x. 1 root root 217 Jan  2 21:35 /usr/bin/redis-daemon
[root@localhost redis]# redis-daemon
[root@localhost redis]# ss -antl
State              Recv-Q             Send-Q                           Local Address:Port                           Peer Address:Port             Process
LISTEN             0                  511                            192.168.116.140:6381                                0.0.0.0:*
LISTEN             0                  511                            192.168.116.140:6380                                0.0.0.0:*
LISTEN             0                  511                            192.168.116.140:6379                                0.0.0.0:*
LISTEN             0                  511                            192.168.116.140:6391                                0.0.0.0:*
LISTEN             0                  511                            192.168.116.140:6390                                0.0.0.0:*
LISTEN             0                  511                            192.168.116.140:6389                                0.0.0.0:*
LISTEN             0                  511                            192.168.116.140:16391                               0.0.0.0:*
LISTEN             0                  511                            192.168.116.140:16390                               0.0.0.0:*
LISTEN             0                  511                            192.168.116.140:16389                               0.0.0.0:*
LISTEN             0                  128                                    0.0.0.0:22                                  0.0.0.0:*
LISTEN             0                  511                            192.168.116.140:16381                               0.0.0.0:*
LISTEN             0                  511                            192.168.116.140:16380                               0.0.0.0:*
LISTEN             0                  511                            192.168.116.140:16379                               0.0.0.0:*
LISTEN             0                  128                                       [::]:22                                     [::]:*

3.创建一个集群
[root@localhost redis]# redis-cli --cluster create 192.168.116.140:6379 192.168.116.140:6380 192.168.116.140:6381 192.168.116.140:6389 192.168.116.140:6390 192.168.116.140:6391 --cluster-replicas 1
>>> Performing hash slots allocation on 6 nodes...
Master[0] -> Slots 0 - 5460
Master[1] -> Slots 5461 - 10922
Master[2] -> Slots 10923 - 16383
Adding replica 192.168.116.140:6390 to 192.168.116.140:6379
Adding replica 192.168.116.140:6391 to 192.168.116.140:6380
Adding replica 192.168.116.140:6389 to 192.168.116.140:6381
>>> Trying to optimize slaves allocation for anti-affinity
[WARNING] Some slaves are in the same host as their master
M: cca97921c6e6f4cac4b075fef8eec3ae58301c67 192.168.116.140:6379
   slots:[0-5460] (5461 slots) master
M: f9d0baee873276c1d4405906484d6e4c3d217eae 192.168.116.140:6380
   slots:[5461-10922] (5462 slots) master
M: 273daa6deb167ae2f8e589148796e6786cc07514 192.168.116.140:6381
   slots:[10923-16383] (5461 slots) master
S: 09e672177d99b6fa8871f36d536ba7a1662ad392 192.168.116.140:6389
   replicates f9d0baee873276c1d4405906484d6e4c3d217eae
S: fb5e1bd01033d4515fd2c228d85c199abc7ae665 192.168.116.140:6390
   replicates 273daa6deb167ae2f8e589148796e6786cc07514
S: 03eab10d2e5c4183ba20475e00d38070696fe24a 192.168.116.140:6391
   replicates cca97921c6e6f4cac4b075fef8eec3ae58301c67
Can I set the above configuration? (type 'yes' to accept): yes
>>> Nodes configuration updated
>>> Assign a different config epoch to each node
>>> Sending CLUSTER MEET messages to join the cluster
Waiting for the cluster to join
.
>>> Performing Cluster Check (using node 192.168.116.140:6379)
M: cca97921c6e6f4cac4b075fef8eec3ae58301c67 192.168.116.140:6379
   slots:[0-5460] (5461 slots) master
   1 additional replica(s)
S: fb5e1bd01033d4515fd2c228d85c199abc7ae665 192.168.116.140:6390
   slots: (0 slots) slave
   replicates 273daa6deb167ae2f8e589148796e6786cc07514
M: f9d0baee873276c1d4405906484d6e4c3d217eae 192.168.116.140:6380
   slots:[5461-10922] (5462 slots) master
   1 additional replica(s)
M: 273daa6deb167ae2f8e589148796e6786cc07514 192.168.116.140:6381
   slots:[10923-16383] (5461 slots) master
   1 additional replica(s)
S: 03eab10d2e5c4183ba20475e00d38070696fe24a 192.168.116.140:6391
   slots: (0 slots) slave
   replicates cca97921c6e6f4cac4b075fef8eec3ae58301c67
S: 09e672177d99b6fa8871f36d536ba7a1662ad392 192.168.116.140:6389
   slots: (0 slots) slave
   replicates f9d0baee873276c1d4405906484d6e4c3d217eae
[OK] All nodes agree about slots configuration.
>>> Check for open slots...
>>> Check slots coverage...
[OK] All 16384 slots covered.

4.应用
[root@localhost ~]# redis-cli -h 192.168.116.140 -p 6379 -c
192.168.116.140:6379> keys *
(empty array)
192.168.116.140:6379> set name zhangsan
-> Redirected to slot [5798] located at 192.168.116.140:6380
OK
192.168.116.140:6380> keys *
1) "name"
192.168.116.140:6380> set age 20
-> Redirected to slot [741] located at 192.168.116.140:6379
OK
192.168.116.140:6379> keys *
1) "age"
192.168.116.140:6379> set name jerry
-> Redirected to slot [5798] located at 192.168.116.140:6380
OK
192.168.116.140:6380> keys *
1) "name"
192.168.116.140:6380> get name
"jerry"
192.168.116.140:6380> get age
-> Redirected to slot [741] located at 192.168.116.140:6379
"20"
192.168.116.140:6379> keys *
1) "age"
192.168.116.140:6379> get age
"20"
192.168.116.140:6379> get name
-> Redirected to slot [5798] located at 192.168.116.140:6380
"jerry"
192.168.116.140:6380> cluster info(cluster nodes可以查看有哪些节点)
cluster_state:ok
cluster_slots_assigned:16384
cluster_slots_ok:16384
cluster_slots_pfail:0
cluster_slots_fail:0
cluster_known_nodes:6
cluster_size:3
cluster_current_epoch:6
cluster_my_epoch:2
cluster_stats_messages_ping_sent:342
cluster_stats_messages_pong_sent:335
cluster_stats_messages_meet_sent:1
cluster_stats_messages_sent:678
cluster_stats_messages_ping_received:335
cluster_stats_messages_pong_received:343
cluster_stats_messages_received:678
total_cluster_links_buffer_limit_exceeded:0
[root@localhost ~]# redis-cli -h 192.168.116.140 -p 6380 -c
192.168.116.140:6380> set name wangwu
OK
192.168.116.140:6380> keys *
1) "name"
192.168.116.140:6380> get name
"wangwu"
192.168.116.140:6379> set age 20
OK
192.168.116.140:6379> get age
"20"
[root@localhost ~]# redis-cli -h 192.168.116.140 -p 6381 -c
192.168.116.140:6381> set name lisi
-> Redirected to slot [5798] located at 192.168.116.140:6380
OK
192.168.116.140:6380> keys *
1) "name"
192.168.116.140:6380> get name
"lisi"
[root@localhost ~]# redis-cli -h 192.168.116.140 -p 6389 -c
192.168.116.140:6389> set name zhangsan
-> Redirected to slot [5798] located at 192.168.116.140:6380
OK
192.168.116.140:6380> keys *
1) "name"
192.168.116.140:6380> get name
"zhangsan"
[root@localhost ~]# redis-cli -h 192.168.116.140 -p 6390 -c
192.168.116.140:6390> set name zhaoliu
-> Redirected to slot [5798] located at 192.168.116.140:6380
OK
192.168.116.140:6380> keys *
1) "name"
192.168.116.140:6380> get name
"zhaoliu"
[root@localhost ~]# redis-cli -h 192.168.116.140 -p 6391 -c
192.168.116.140:6391> set name tianqi
-> Redirected to slot [5798] located at 192.168.116.140:6380
OK
192.168.116.140:6380> keys *
1) "name"
192.168.116.140:6380> get name
"tianqi"